How to Clear DNS Cache on Android Devices
You simply need to flush the DNS cache to fix it, and the website should start loading. So if you are also facing connectivity issues, you can follow our tutorial and clear the DNS cache on Android devices. We have added multiple solutions, including a root method and changing the DNS server entirely.
What DNS Cache is?
Before jumping into the solutions to Clear DNS Cache, let’s briefly discuss it first to gain a better understanding. DNS cache is actually referred to as the information that is temporarily saved to boos the web page’s loading speed. It keeps a copy of the local DNS, which helps your browser to retrieve it instantly and resolve the website URL to its corresponding IP address efficiently.
1. Clear DNS Cache in Google Chrome
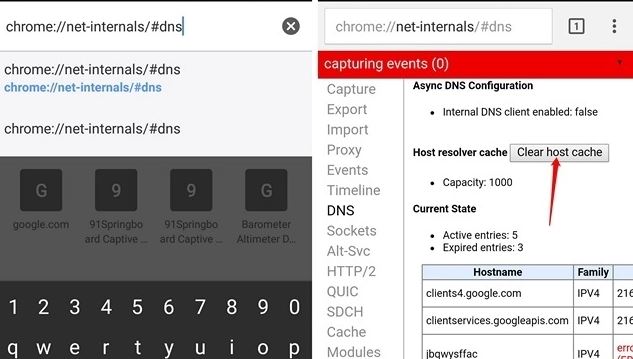
On Android devices, Chrome is not just the default browser, but also handles a lot of system functionalities in the background. If you are a regular Chrome user, you can flush the DNS cache on Android right using a hidden Chrome URL. Here is how to go about it.
1. First, open Chrome on your Android device and type the below path. Then, hit Enter.
2. Reconfigure DNS Settings on Android Devices

Despite that you have cleared the DNS cache and are still unable to load pages properly, don’t worry, there is another way to solve the issue. Changing the DNS address settings on your Android device might help you to resolve the issue. The process is simple, and you just need to go through some easy steps. To do this, here are the steps;
3. Empty the Cache From Chrome’s Setting Page
While it’s largely believed that clearing Chrome’s browsing data like cache only removes cached images and files, some users point out that emptying the app cache resolves many of the DNS issues as well. So if the above method didn’t work for you, go ahead and empty the cache from Chrome’s app info page.
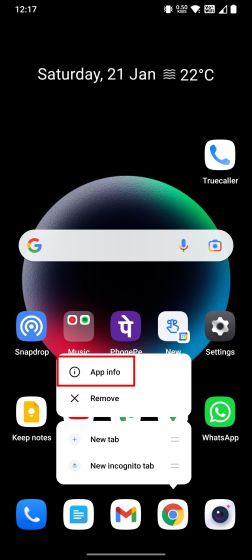
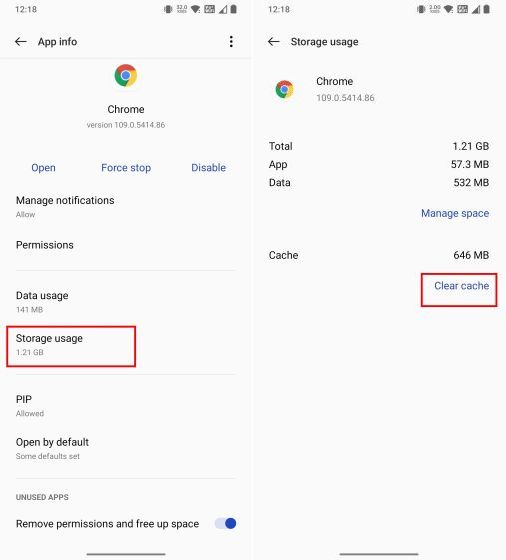
1. On your Android phone or tablet, tap and hold Chrome to see a quick shortcut menu. Tap on “i” or “App Info” to open Chrome’s app information page.
2. Here, open “Storage usage” and tap on “Clear cache” on the next page. This will delete all the local cache stored on your Android device and will likely fix DNS-related issues as well.
4. Changing Wifi Network DNS Settings
If you are browsing the internet on your Android device through a wifi connection and unable to load pages properly, you can change the DNS settings for that particular Wifi network. To do this, follow these easy points;
- Open the Settings menu from your Android device.
- Tap on the Wifi option.
- Pick the network you are using form the Wifi networks list and long tap on it until you see the settings options.
- Form there, tap on the Modify Network option.
- You will see a Popup window, tap on the Advanced options.
- Tap on the IP Address option and select the Static IP option.
- Scroll down to find the DNS Address.
- Enter the manual DNS address as for DNS 1 (8.8.8.8) and DNS 2 (8.8.4.4).
- Tap on the Save option.
5. On Android 9 and Above
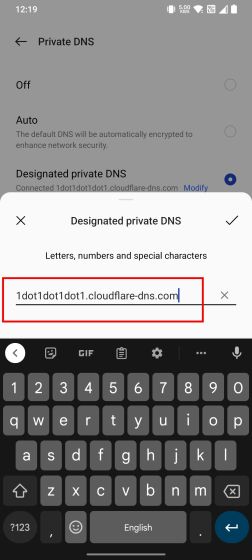
1. Open Settings on your Android device and move to “Connecting & sharing“. Here, you will find the “Private DNS” option. On other Android skins, the Private DNS setting might be under “Connections”.
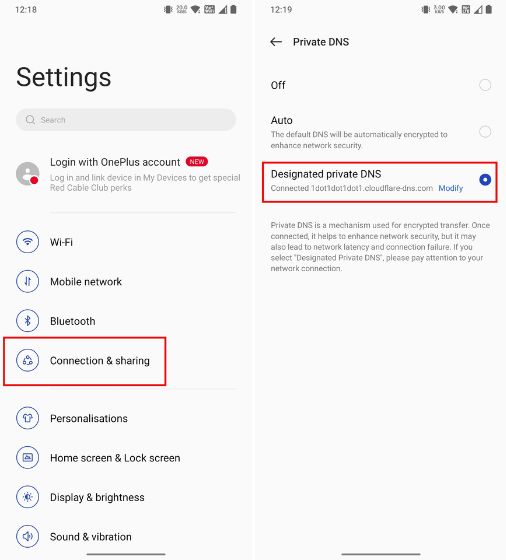
2. Next, choose “Designated private DNS” and tap on “Modify“. Here, enter the DNS server of your choice. For example, I have entered Cloudflare’s DNS hostname, which is 1dot1dot1dot1.cloudflare-dns.com. By the way, you can find the best DNS servers using our linked article.
6. Third-party Apps to Change the Android DNS Settings

You can easily find numerous third-party apps that you can install and change the DNS settings on your Android device. Regardless of what app you are choosing to change your Android’s DNS settings, the process is almost the same. For instance, we are using the DNS Changer app to change our DNS settings. Here is the procedure on how to change the DNS settings using DNS Change app.
- After downloading and installing the DNS Changer on your Android phone, launch the app.
- On the main page of the app, you will see the Start option. It helps you to change the DNS settings on your Android to your desired DNS settings.
- You can pick any of the DNS settings, such as Open DNS, Google DNS, Level 3 DNS, Yandex DNS, or if you want to make your own settings manually.
- Tap on the Start option, and you will see a popup requesting a connection.
- Tap on the Allow option.
- It will clear all the DNS cache from your Android device and replace the old DNS settings with new ones.
Conclusion
We sincerely hope that now you have gained enough knowledge about what DND cache is, how it works, and how to Clear DNS Cache on your Android device. If you ever experience any problem while browsing and unable to load pages properly, make sure to clear the DNS cache first using our guide before trying other methods.
FAQs (Frequently Asked Questions)
Q: How to Clear DNS Cache on Windows?
Ans: if you want to Clear DNS Cache on your Windows operating system, just go to the run Command open CMD, right-click on the Command Prompt to run it with Administrator privileges, then type ipconfig/flushdns command and press Enter.
Q: What DNS cache do?
Ans: Whenever you open a website on your browser, it saves a copy of that web page containing hostnames and IP addresses, which helps your browser to load that web page instantly the next time you visit that page.
Related post


0 comments
Leave a reply
Please Login or Register to Comment. Get StartedShare this article